Splicing safety, controls, quality and rear splice methods
Feb 7, 2017
Although splicing techniques should be adapted to the needs and practices of each mill, the procedures listed here may be followed for good results.
Overview of splicing
Four splicing techniques will be presented in this two article series:
- Over rear splicing
- Under rear splicing
- Front splicing, Method 1
- Front splicing, Method 2
Safety issues when splicing

 |
DANGER: SPLICING CAN BE A RISKY PROCEDURE. Do not disable or bypass safety devices or equipment interlocks. These are present to decrease hazards. Make sure to leave any safety gates open and do not reset any safety circuits until all personnel have exited protected areas. To avoid slipping on broke or other hazards, clean the working area before activating any equipment. Remain alert at all times. To avoid crush injuries, keep hands, body, and clothes away from nips at all times, especially when the drums are rotating. During front splices, be very careful around the nip formed by the front drum and the roll set. Keep all unnecessary personnel away from the winder during splicing procedures. Do not activate equipment without knowing that all participants are clear of nips, familiar with their tasks, and ready to proceed. Maintain unrestricted visibility of all participants and moving equipment. |

Splicing controls
Refer to mill documentation to locate and understand existing controls.
NOTE: Some windup sections have a local control (button, switch, or footswitch) which must be held to initiate winder movement. Movement will stop as soon as the control is released. When all safety devices and procedures are used as designed, this is the only control which will activate winder movement during a front splicing procedure.

 |
DANGER: Do not disable or bypass the conditions which require the use of local controls, or the programmed safety interlocks. These are in place to minimize the hazards associated with splicing procedures. The person controlling the drum / unwind rotation is responsible for supervising all participants and steps involved in the splicing procedure. |

Tips to maximize splice quality
Splicing should always be performed quickly but carefully. If splicing is delayed, the humidity of ambient air tends to affect the web, resulting in increased or decreased paper moisture near the splice. This can cause problems with web stretching, web breaks, and/or transverse stability of the web during the next converting process.
The splice, and the paper on either side of the splice, must be uniformly stressed and wrinkle free.
The tape must not adhere to multiple layers of paper.
Front splices should be slightly angled so that the entire splice does not enter the nip at the same time during the next converting process.
Splices must be as thin as possible. Do not overlap tapes.
Rear splicing methods
Rear splicing (over)
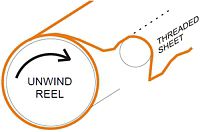
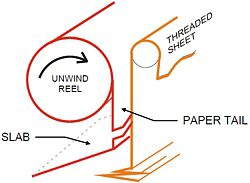
3. Slab off the bad part of the reel, or change the reel. Leave the paper tail hanging in front of the reel.
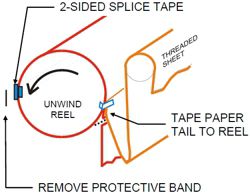
5. Lift the paper tail off the floor and temporarily fasten it to the reel using a few pieces of tape.
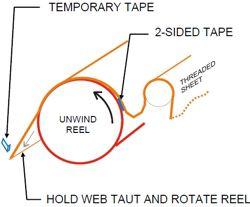
7. Stop the winder.
8. Remove the temporary tape from the tail. Carefully, tighten and straighten the web while rotating the reel backwards.
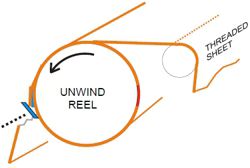
10. Tear off the excess tail to create a clean edge at the splicing tape. Seal the edge with tape.
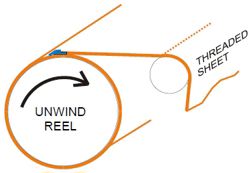
12. Have all personnel exit the winder area. Reset all safety circuits.
13. Run the winder at thread speed for a short time, then resume run speeds. If wrinkles appear on the splice, re-splice at the drums or during the next winding process (ie: using a rewinder).
Rear splicing (under)
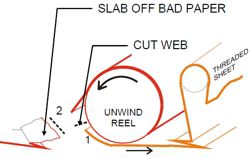
2. Slab off the defective paper or change the reel. To slab off the paper, run the unwind at thread speed while holding the tail of the reel sheet. The tail of the threaded sheet will pile up in front of the reel.
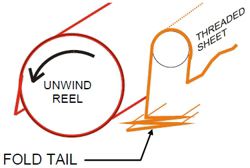
4. Neatly fold the tail of the threaded sheet on the floor in front of the reel.
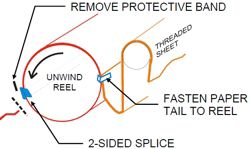
6. Temporarily tape the tail of the threaded sheet to the reel with one-sided tape.
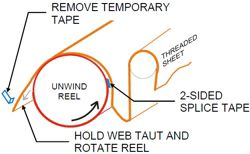
8. Remove the temporary tape from the tail.
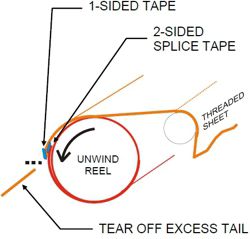
10. Stop the winder.
11. Tear off the excess tail to create a clean edge at the splicing tape. Seal the edge with 1-sided tape.
12. Tighten the web carefully, rotating at thread speed.
13. Have all personnel exit the winder area. Reset all safety circuits.
14. Run the winder at thread speed for a short time, then resume run speeds. If wrinkles appear on the splice, re-splice at the drums or during the next winding process (ie: using a rewinder).
This article series continues with a discussion of front splicing methods. For more information on safe and efficient splicing operations, contact your Valmet representative.