Maintain and troubleshoot winder hydraulic parking brakes
Typical hydraulic brake operation
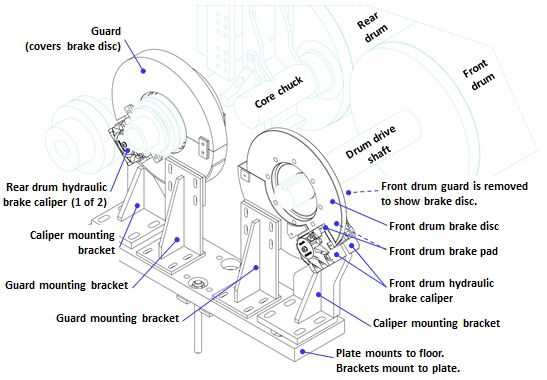
Front and rear drum brakes are installed on a winder, typically on the drive side, in order to improve personnel safety. Each brake (Figure 1) consists of a hydraulic caliper which moves two brake pads to contact either side of a brake disc. The parking brakes assure the drums are at zero speed while personnel are working in the windup area. Guards are provided to protect personnel from the revolving brake discs and to protect the brake discs themselves.
Hydraulic parking brakes for the winder drums may be used during splicing and set change / roll kickout if the front and rear drum drives cannot hold a drum at zero-speed for some reason.
The brakes may also be used during coast stop and emergency stop when the winder has slowed enough such that using them will not kick out the roll, i.e. less than 100fpm.

Figure 1 Front and rear drum hydraulic brakes on a typical winder
Hydraulic brake maintenance
Refer to the brake manual supplied by the vendor for brake-specific instructions.
Follow mill procedures and OEM instructions regarding service and lubrication and keep the brakes in good condition. Keep the brake area clean. Repair oil leaks. Remove oil, loose paper and dirt from the mechanical drive. Do not change the brake structure, control or adjustments without consulting the OEM.
The following are general hydraulic brake maintenance instructions.


The brake becomes very hot at a web break and in exceptional situations.


Follow the brake manufacturer's instructions regarding maintenance and adjustments.


Do not disable, remove, or alter any guard. You may become entangled in unguarded rotating parts. A guard may only be removed for repair work. Install all removed guards back in their proper positions before testing or operating the winder.

Typical maintenance schedule
Daily
- Check for proper operation.
Monthly
- Check for hydraulic leaks. Repair or replace lines or calipers as needed.
Quarterly
- Perform an inspection for excessive wear of brake pads. Replace as needed.
- Verify guards do not come into contact with calipers or discs; adjust as needed.
Annual
- Perform an inspection for excessive wear of brake discs. Repair or replace as needed.
Checking the Brakes
1. Disconnect the energy sources.
2. Discharge the hydraulic accumulator pressure by closing the shutoff valve in the valve cabinet.


Make sure that the brake work line has no pressure.

3. Check if the hydraulic brake leaks. The brake must not leak. Leaking of the brake can be due to insufficient bleeding. Follow the instructions provided by the brake manufacturer.
4. Check the brake disc. Clean if necessary, grease and oil significantly diminish brake efficiency.
Check the condition of the brake disc. Check that the brake disc is straight. Check that there are no cracks on the brake disc. Replace the brake disc if any of the above mentioned faults occurs.
Check the thickness of the brake disc. Replace the brake disc if its thickness is under the limit value.
Worn-out brake discs must be replaced with similar new brake discs. Do not machine the brake disc. The properties of a machined brake disc will change.


Defective or unmaintained brake discs do not necessarily function as intended.


Defective or machined brake discs may break during run due to brittle or fatigue fractures.

5. Check the brake pads. The minimum thickness of the brake pads should be mentioned in the brake manufacturer's instructions. Replace if needed.
Check that the brake pads are clean. Grease and oil significantly diminish the efficiency of the brake.
Check that the brake pads are not glazed and that they have no cracks. Replace if needed.
6. Check the brake pad mounting.
7. Check that the brake is in a central position with regard to the brake disc.
8. Check the air gap of the brake pads.
9. Check the routing of brake hoses and brake pipes. Pipes and hoses must not touch rotating parts or structures, such as guards.
10. Turn the hydraulic accumulator valves to the correct positions.


Check the filling pressure of the accumulator. Accumulator must function properly.

11. Make sure the brake hydraulic circuit is ready to function.
12. Reconnect the energy sources.
13. Check the closing and opening of the brake.
14. Bleed the brake.


The brake must function faultlessly.

Troubleshooting the Brakes
If the brakes do not function rigorously when the winder is stopped or started, refer to the following:
CAUSE: The friction surfaces are glazed, oily or worn out.
ACTION: Change to new brake pads.
CAUSE: The brake leaks.
ACTION: Disassemble the brake. Clean and change all the seals. Clean the brake disc. Change to new brake pads.
CAUSE: Not enough hydraulic pressure for the brakes.
ACTION: Check the positions of the valve block shut-off valves. Check for possible leaks in the hydraulic circuit. Bleed the brake.
For more information about winder modifications and improving safety around the winder, contact your Valmet representative.