Troubleshooting cores falling during a winder auto setchange
Nov 17, 2015
Typical core loader operation

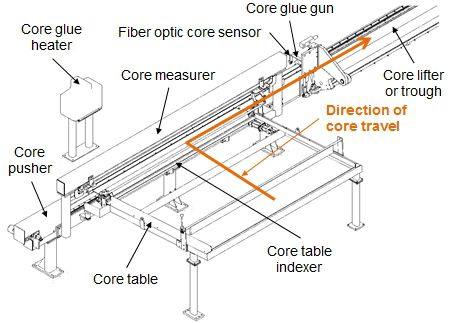
Figure 1 Typical core supply system outside winder tend side
A typical core supply system is illustrated in Figure 1. In this example, cores are stacked onto a core table where an indexer indexes the cores into a trough outside the tend side of the winder. The cores are then pushed past a measuring assembly and glue gun into a core lifter assembly inside the winder (or sometimes directly into a core trough inside the winder).

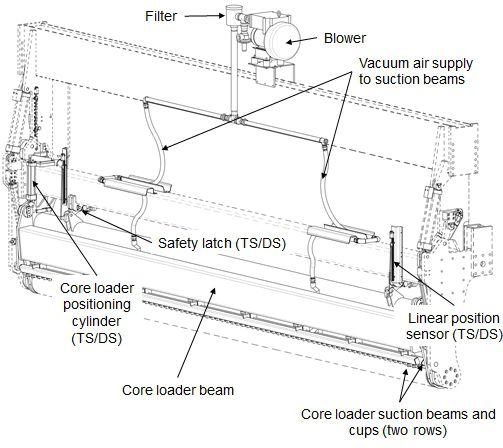
Figure 2 Typical core loader (roll ejector shown with dashed lines)
The cores are then picked up by suction cups mounted on a core loader assembly (Figure 2). The core loader assembly is typically mounted to the roll ejector assembly. The core loader receives the cores from the core lifter assembly or core trough, then transfers them into the drum pocket.
Chronic problem - cores falling during set change
Every core loader eventually runs into the same problem at some point - the cores fall during the set change process. The following list of probable causes and their corresponding corrective actions are some troubleshooting steps to follow in order to diagnose and resolve cores falling from the core loader. But first, some safety considerations...


Troubleshooting list for falling cores
Core trough is dirty, core trough alignment is incorrect or core trough is twisted.
- Clean the core trough.
- Check the core trough straightness and alignment.
Suction cup contact to the core is insufficient.
- Check the core trough straightness and alignment.
- Check the core loader straightness and alignment.
Suction cups are dirty, holes are blocked or suction cups are broken.
- Check the cleanliness of the suction cups.
- Check the roll ejector alignment.
Vacuum blower is dirty or filter is clogged.
- Check the vacuum blower filter.
- Clean the vacuum blower.
Vacuum blower is not working.
- Check if there is enough pressurized air for the vacuum blower.
- Verify the vacuum blower exhaust pipe is not blocked.
- Check the vacuum blower function. The vacuum blower must be clean and correctly adjusted. The exhaust pipe must not be blocked. Follow the maintenance instruction provide by the vacuum blower manufacturer if the vacuum blower needs to be maintained or adjusted. The vacuum blower has been adjusted to a certain pressure ratio. An erroneous adjustment of the vacuum blower reduces the suction effect dramatically.
Leak at the suction connection.
- Check the connection between the vacuum blower and the suction connection.
- Check the sealing of the suction connection.
For more information on core loader maintenance and core supply system improvement recommendations, contact your Valmet representative.