Attenuators - operation, maintenance and troubleshooting
Feb 17, 2021

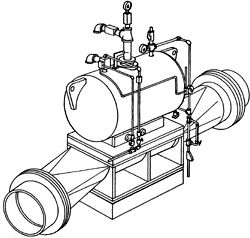
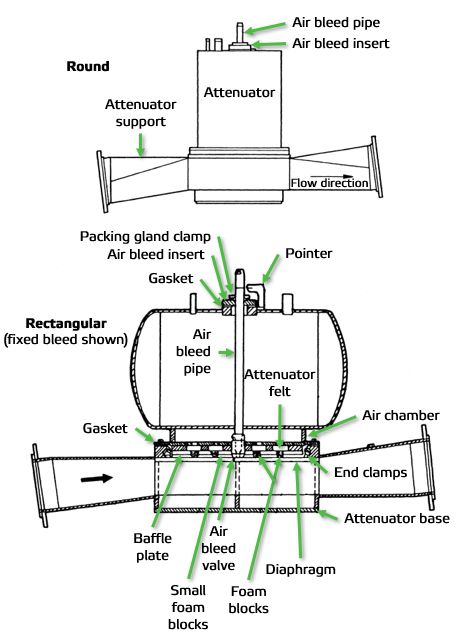
Air is supplied to the attenuator at a constant rate. An air bleed is automatically regulated so that the attenuator's air pressure remains equal to the stock line pressure. A sensitive diaphragm, separating the stock from the air, deflects as required to absorb fluctuations in the stock flow.

Figure 1 Rectangular and round diaphragm attenuators

 |
NOTE: These example operating, maintenance and troubleshooting instructions are based on older attenuator types and are only intended to give general procedures to understand accumulator functions and troubleshooting. Refer to the OEM operation and maintenance manual for your existing accumulator for the correct procedures. |

Overview of operation
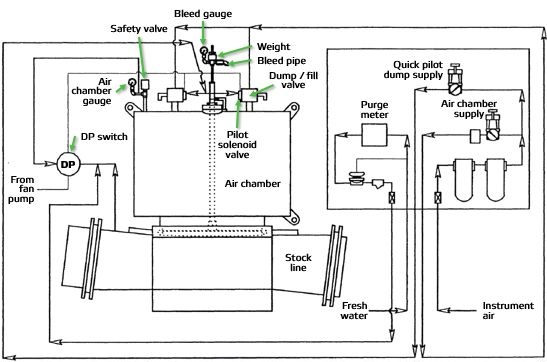
Operation of the attenuator is initiated when the fan pump is powered on. Power travels through a differential pressure (DP) switch to the pilot solenoid valves. The pilot valves direct air pressure into the dump/fill valves. During operation of the fan pump, the dump/fill valves will allow supply air into the air chamber. When the fan pump loses power, the dump/fill valves will shut off the supply air and exhaust the pressurized air from the chamber.

Figure 2 Typical operation diagram
Normal operation of the attenuator begins when the air pressure in the chamber is balanced against the stock pressure in the headbox inlet pipe (normally five to ten minutes after the fan pump starts). It is at this time that the bleed pipe will drop to its lowered position and air bleeding will begin. Air escaping from the bleed pipe can be heard, felt and seen (by watching the bleed gauge) at three to five second intervals. In addition, depending on the size of the pulsations reaching the attenuator, the bleed pipe may jump up and down. Weights are added to the bleed pipe to keep jump to a minimum.
To protect the diaphragm, the attenuator may dump (exhaust) during operation of the fan pump. The DP switch mentioned above will cut power to the pilot valves if the air chamber pressure exceeds the stock pressure by two psi. This dumping normally occurs during fan pump ramp down but can also occur if the bleed pipe is plugged. The stock pressure side of the DP switch is water purged (one gallon/hour). This purge line should be checked regularly to make sure that it remains unplugged.
After initial set-up, the attenuator has no operating procedure. Operation remains automatic as long as the controls are not changed.
Installation and maintenance check
Mount the attenuator base on the foundation with appropriate shimming. Complete the stock piping connections after insuring that debris has been removed from within the stock conduit.
It is good practice to check the diaphragm at some convenient time (approximately twice a year) for damage, excessive slack, dirtiness, etc.
Drain cocks can be used at any time as a quick check to determine if water is getting past the diaphragm.
Controls
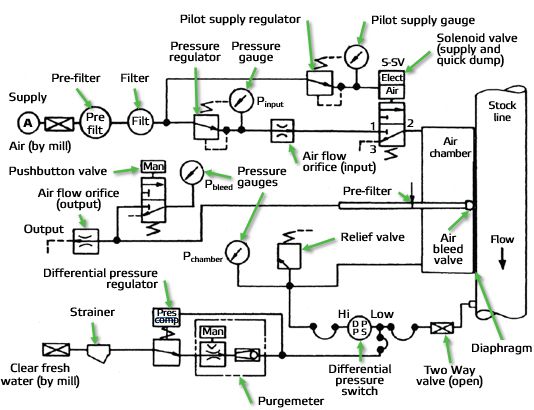
NOTE: The control schematic shown in Figure 3 is a typical schematic only. See the schematic furnished with your attenuator for details.

Figure 3 Typical control schematic
Installation of controls
- Locate all devices in the supply air line in a convenient location for maintenance and adjustment, preferably near the attenuator. The air supply should be clean and dry with a moisture content of not more than a pressure dew point of 45 to 50°F (8 to 10°C) at 100 psig (7 kg/cm2).
- Furnish access to the top of the air chamber so Pbleed pressure gauge(s) on the air bleed pipe(s) and the chamber gauge can be observed. In addition to furnishing these two quantities, these gauges permit the determination of two other important guideline parameters: time-to-fill and percentage bleed.
- Solenoid valve S-SV should have no restrictions in the exhaust port. Locate the valve on a 2 inch (50.8 mm) pipe stub welded to the attenuator air chamber, and provide suitable protection to keep dirt and water from entering the exhaust port.
- Blow down the air supply line to remove all foreign materials before connecting air line to the attenuator air control components. Check filters to insure the elements are clean before attempting the set-up of the control devices.
Setup of control devices
For initial startup, obtain the prescribed set points of the devices from the control air piping schematic that should have been furnished with the attenuator, and proceed as follows.
- Make certain that the reference ring and vertical line engraved on the 1-1/2 inch (38 mm) bleed pipe are both aligned with the fixed pointer. This means that the bleed valve is at its proper height, i.e., it is projecting 1/2 inch (12.7 mm) below the metal baffle plate inside the attenuator for the fixd bleed system, and 1/16 inch (1.58 mm) for the retractable bleed system. Make certain that the packing gland is tight. If there are two bleed pipes, align both.
- Do not interchange input orifice and output orifice(s). The part numbers should be stamped on them, and the input orifice has a much smaller diameter.
- Check that the high and low pressure connections to the differential pressure switch are not interchanged.
- Check the elevation difference of the switch and diaphragm. The recommended approximately 2/3 pipe diameter difference yields a more sensitive threshold for larger diaphragms. Also, check the switch's pressure differential setting.
- Set the supply regulator to furnish the prescribed input pressure, and tighten the locking nut.
- Set the pilot air line pressure regulator as prescribed on the fluids drawing and tighten the nut.
- Check the fan pump interlock control wiring and the wiring to the differential pressure switch.
- Check that the purge water flow is as specified. This flow should never be shut off.
Operation
Following the initial setting up of the system, there is no operating procedure. Operation is automatic as long as the controls are not changed.
The following steps refer to Figure 3. With the controls installed and adjusted:
- Start the fan pump. If this is either the initial or a "checking" startup, notify someone to monitor a watch as well as monitor the attenuator air pressure gauges.
- When the fan pump circuit is energized, the supply solenoid valve will open, gradually pressurizing the air chamber.
- After a few minutes, the air chamber pressure will have risen to match the stock pressure. The bleed valve inside the attenuator will then begin to release air intermittently to maintain the matched-pressure condition.
- The attenuator should now be functioning. Successful operation is dependent upon a leak-free air chamber and control system. Check all air piping and gaskets for leaks and take action as required. Check both drain cocks to insure there is no leakage of water past the attenuator diaphragm into the air chamber. Leakage will be taken up by the damping materials above the diaphragm, rendering them impervious to air, and preventing the attenuator from functioning properly.
Checking reference values
- With a leak-free control system, note and record, to the nearest quarter-minute, the time-to-fill interval, i.e., the time interval required, following the energizing of the pump circuit, before the bleed valve first started to bleed air. (The onset of the intermittent bleeding is indicated by swings of the Pbleed gauge needle and by the sound of air escaping from the output orifice.)
- Obtaining the time-to-fill interval is not as urgent as monitoring the initial (potentially excessive) percentage bleed, as described later. Sometimes it is inconvenient to obtain this interval during a busy startup. As soon as conditions permit, the lever on the safety valve can be used to gently reduce the air chamber pressure to atmospheric. The release of this lever (closing of the valve) then furnishes the “zero” for the subsequent measuring of the time-to-fill. In the future, this procedure can be used at the end of a reel, for re-checking time-to-fill (and/or for checking the effectiveness of the attenuator).
- Note and record the (steady) air chamber pressure, Pchamber.
- Using the pushbutton valve, note and record the reading (Pbleed) reached by the bleed gauge during the longest of the brief intervals of bleeding.
- The determining of percentage bleed is detailed in the following section on Maintenance. If bleeding happens to be continuous or nearly continuous, the input pressure regulator should immediately be turned down, and an investigation undertaken.
- Over a period of a minute, or over several such periods, estimate the average percentage-of-time that the bleeding is occurring. For a one-bleed-channel system, this should normally be less than 40%. For a two-bleed-channel system, one of the two channels should be bleeding somewhat less than 80% of the time, and the other channel will normally not bleed at all; however, the capability of the second channel to bleed should be checked. Block the output of the first-to-bleed channel for a minute or so, and note whether the percentage bleed and Pbleed of the second channel approximately match those of its partner.
- Check that the input pressure Pinput, still has its prescribed value; record this number.
- These four readings: Pinput , Pchamber, Pbleed and percentage-of-time-bleeding should be recorded in an accessible location so that they can serve as reference values. In the future, if the need should ever arise, significant changes from these readings will furnish clues during troubleshooting.
- The table below shows the anticipated (approximate) values of air flows and of: a) time-to-fill Pchamber, b) Pbleed and c) percentage-of-time-bleeding
- If the input pressure has been set carefully, and if there is no debris in the air lines, and if there are no air leaks, then these three quantities, 9a, 9b, 9c, should lie reasonably near the values predicted, for that particular Pchamber.
Approximate air flow values
| Press. in air chamber (psig) | Time for chamber to fill (min) |
NORMAL RUNNING CONDITIONS |
||||
|---|---|---|---|---|---|---|
| Steady input flow (scfm) | Max. of varying output (scfm) | %age of bleed capacity (%) | READING ON BLEED GAUGE | |||
| @avg bleed (psig) | @max bleed (psig) | |||||
| Pmin 7 | 3.3 | 4.9 | 10.4 | 47.4 | 0.7 | 3.0 |
| Pdes. 10 | 4.8 | 4.9 | 12.8 | 38.4 | 0.7 | 4.4 |
| Pmax 14 | 6.7 | 4.7 | 15.5 | 29.6 | 0.6 | 6.5 |
Maintenance
By occasionally checking the air pressure gauges; readings, and the percentage bleed, and comparing them with the reference values noted and recorded at start-up, an indication of the condition of the system can be obtained. Allow for changes in machine operating conditions which may have led to significant change in the stock pressure at the attenuator and hence, automatically, in Pchamber.
The air prefilter and filter should be checked and cleaned as a part of routine preventive maintenance. The flow of purge water should be checked occasionally; the strainer should be routinely cleaned; the purge line may require cleaning at times.
Until experience with your stock and your set of operating conditions indicates the advisability of increasing or decreasing the frequency of checking, the diaphragm should be checked (damage, excessive slack, dirtiness, etc.) at a convenient time, approximately twice a year. Procedure and guidelines should have been furnished in an accompanying set of instructions dealing with the mechanical aspects of the attenuator.
Troubleshooting the attenuator
Possible symptoms of malfunctioning of the attenuator, plus suggested remedies, are discussed here with reference to Figure 3. Most of the symptoms described here would be anticipated only at the initial startup.
If one of the first three sets of symptoms should happen to occur, quickly operate the lever on the safety valve manually, and have someone shut off the air supply. Hopefully, these improbable but possible conditions will be noticed before the protective features of the safety valve and of the pressure differential switch system are called into play. The diaphragm will probably have been greatly over-stressed and permanently deformed if it should also happen that the pressure differential system has not been installed correctly.
Fast pressure rise time
Symptom: The air chamber pressure, Pchamber, rises to approximately the anticipated level, but in a much shorter time than anticipated. Bleeding is occurring 100% of the time, and Pbleed is a much higher fraction of Pchamber than anticipated.
Analysis and suggestions: The input orifice and the output orifice probably have been installed in interchanged positions. If comparison of the part numbers stamped on each with those prescribed in the controls drawing indicates that this is not the case, then, with the air supply still shut off, remove the orifices from the system and check their internal diameters. The diameters should agree with the values indicated on the supplied drawing. The output orifice diameter should normally be approximately 2.8 or 3.2 times the input orifice diameter. Take appropriate action.
High bleed
Symptom: The air chamber pressure rises to approximately the anticipated level, with approximately the anticipated time-to-fill, but bleeding is occurring 100% of the time (or at least much more than the anticipated percentage), and Pbleed is a much higher fraction of Pchamber than anticipated.
Analysis and suggestions: There is probably debris in the output orifice, or the output orifice is not of the correct size. Check both possibilities.
Low bleed
Symptom: The air chamber pressure rises to approximately the anticipated level, with approximately the anticipated time-to-fill, but bleeding is occurring 100% (or near 100%) of the time, and Pbleed is a much lower fraction of Pchamber than anticipated.
Analysis and suggestions: There is probably debris in the bleed valve (which is down inside the attenuator) which is in intermittent contact with the diaphragm. (Alternatively, the bleed valve's hole may happen to be undersize. The diameter called for and shown in the drawing should normally be approximately 2.8 times the diameter of the input orifice, and should be the same size as or approximately 0.89 times the diameter of the output orifice.) With the air shut off, remove the connections to the top of the 1-1/2 inch (38.1 mm) pipe, loosen the gland and remove the plate, unscrew the bleed system in the bleed valve and its mating plate inside the attenuator, and remove it through the top of the air chamber. After checking and remedial action, restore the parts to their original positions. Make certain that the reference ring and the vertical line engraved on the 1-1/2 inch (38.1 mm) pipe are again aligned with the pointer (bleed valve height indicator) before tightening the gland. If the central bleed hole in the bleed valve required enlarging, make certain that burrs are removed and that the end surface of the bleed valve is again polished as indicated in the drawing.
Also, indicate on all copies of the controls drawing the remedial action which was taken. (It should be noted that this procedure can be carried out without shutting down the paper machine.)
No pressure
Symptom: Air chamber fails to develop any pressure when the fan pump is on.
Suggestions:
- Check that there is Pinput, and, if not, check the air supply (A).
- Check that the solenoid valve (S-SV) is operating. If not, check the fan pump interlock wiring, supply voltage and pilot air pressure. (See the wiring diagram furnished for this attenuator.) Also, check the wiring to the differential pressure switch (Figure 3) and to the solenoid.
- Check the solenoid and verify that the supply port of the solenoid valve actually opens, and that the exhaust port actually closes when energized.
- Check that the two connections (air and water) to the differential pressure switch are not interchanged (and that purge water is flowing).
Low pressure
Symptom: Air chamber develops detectable pressure, but this pressure is less than anticipated for the particular machine running conditions. The rate-of-climb of pressure to this level was less than anticipated, and the bleed channel does not bleed any air (except perhaps a minor leak, such as that via the threads on the bleed valve, normally not enough to register on the Pbleed gauge).
Suggestions:
- Check that the packing gland supposedly sealing the 1-1/2 inch (38.1 mm) pipe is tight.
- Check for air leaks in the controls piping and at the attenuator gaskets. Check the drain cocks and safety valve.
- Check that the solenoid valve exhaust, when energized, is not sticking slightly open.
- Check that the solenoid valve supply port actually opens when energized, and that Pinput is at the prescribed level.
- If necessary, turn off the air supply temporarily, remove the input orifice from the line, and check for debris and that the orifice is approximately of the prescribed diameter.
Low pressure and rate of climb
Symptom: Air chamber develops detectable pressure, but this pressure is less than anticipated, and the rate-of-climb of pressure to this level was less than anticipated, and the bleed channel is bleeding continuously, and there is a detectable reading on the Pbleed pressure gauge.
Analysis and suggestions:
For fixed bleed systems only:
The bleed valve may not be protruding the prescribed half-inch (12.7 mm) below the baffle plate inside the attenuator, but is probably approximately even with (or slightly recessed into) the baffle plate. The diaphragm will not be able to seal the hole in the bleed valve.
- Check that the reference ring and vertical line engraved on the 1-1/2 inch (38.1 mm) pipe are aligned with the pointer (bleed valve height indicator). Tighten the packing gland if the height is changed.
- If, instead, this is a one-bleed-channel system, or if it is a two-channel system in which the problem has been interpreted as in (1) below, then tentatively assume, first, that incorrect height of the bleed valve may be the cause, and that the reference ring on this channel's pipe has been inadvertently placed at the wrong height. Loosen the packing gland slightly, carefully lower the whole bleed channel 1/4 inch (6.35 mm) by rotating the 1-1/2 inch (38.1 mm) pipe one turn clockwise, and tighten the gland. If this bleed channel now assumes normal control, it is probable that the bleed valve had been flush with the baffle plate, or perhaps slightly recessed, rather than protruding.

 |
NOTE: An improbable but possible alternative would be that normal control has been established because the act of rotating the bleed valve has temporarily displaced the debris to a non-interfering location. Repeated raising and lowering the bleed channel may help clarify the problem. |

Lower the bleed channel an additional 1/4 inch (6.35 mm) on the assumption that the bleed valve surface will now be at the prescribed 1/2 inch (12.7 mm) protrusion. Sand off the old ring on the pipe, and lightly engrave a new ring at the assumed correct height, 1/2 inch (12.7 mm) above the old ring, and in line with the pointer. The vertical line previously engraved on the pipe will retain the correct angular location, since the pipe has been lowered an integral (two) number of turns. If the attenuator continues to function properly over a significant time interval, it is probable that incorrect height rather than temporarily displaced debris was the cause.
At the earliest convenient down time, remove the air chamber from the attenuator base and check whether the half-inch shift was actually the correct remedy. Also check for debris, including some that may be less obvious. If the interpretation leading to the 1/2 inch (12.7 mm) lowering of the bleed valve was incorrect, the bleed valve protrusion would have been an undesirable inch in the interim.
For both types of bleed systems:
Hard irregular debris in the immediate vicinity of the bleed hole may be preventing the diaphragm from contacting and sealing the hole in the bleed valve. Another possibility is detailed in step four below.
- If this is a two-bleed-channel attenuator, temporarily block the output of the previously bleeding channel. After allowing time for the pressure to build up in the air chamber, note whether the second channel assumes normal control of the (intermittent) bleeding and the attenuator appears to begin functioning. If this occurs, this indicates that the previously continuously bleeding channel probably has either debris or an improper height, as mentioned in the analysis. Unblock the output.
- If it appears that the problem arises from debris interfering with the sealing of the bleed hole by the diaphragm, it will probably be necessary to shut down (but see (3) below). Remove the air chamber from the attenuator base, and remove the debris. Use the opportunity to check for other debris that might shift and cause problems in the future. Do NOT attempt to avoid this step and try to solve the problem by raising the input pressure input appreciably above the prescribed level. The desired automatic matching of air pressure to stock pressure cannot be achieved by such a brute-force technique.
- Before resorting to the inconvenience of a shutdown, it may be considered worthwhile to try to remove the debris by careful use of a vacuum hose or pipe. Shut off the air supply, and remove the bleed channel via the top of the attenuator. A light may reveal that the debris on the diaphragm has remained within the boundaries of the 3-1/4 inch (82.55 mm) hole in the metal plate vacated by the bleed valve, If so, careful insertion and manipulation of a vacuum cleaner wand or suction hose may permit removal of the debris without causing damage to the nearby polyurethane foam blocks. Adhesive on the end of a rod would be another potential
means of removal. Alternatively, it may be necessary to shut down, but then attempt vacuum-assisted or adhesive-assisted removal before resorting to the removing of the air chamber from the attenuator base. The diaphragm would then be sagging under the effect of gravity, rather than being pressed tightly up against the baffle plate by the stock pressure. This might make the debris more easily retrievable. - A third possibility, aside from height and debris, is that the prescribed spot-drilling in the 1-1/2 inch (38.1 mm) pipe (for anchoring the setscrew) may have created a hole completely through the pipe wall and the setscrew may not have been installed (or may have fallen out before being tightened). This unplugged hole would short-circuit the intended controlling action of the bleed valve hole, and cause continuous bleeding instead. Removal of the entire bleed channel via the top the attenuator would permit checking of the hypothesis without the necessity of a down time to remove the attenuator air chamber from the air base. However, if the absence of the setscrew, combined with binding of the bleed valve's other (3-1/4 (82.55 mm) 4NC) thread, happens to cause the 1-1/2 inch (38.1 mm) pipe to unscrew from the bleed valve rather than the bleed valve to unscrew from the metal plate, the air chamber would still have to be removed from the base.
- In a two-bleed-channel system, if debris appears to be at fault, temporary remedial action may postpone the need for a down time. Temporarily insert a plug into the outlet (normally a 90 degree street elbow) of the defective channel, and, at the same time, temporarily lower Pinput until the other (now controlling) bleed channel bleeds less than 50% of the time. Some risk is involved in this. If the debris is hard and sharp-edged, it may take only a short while before the diaphragm sustains significant damage. Moreover, the debris may migrate to the site of the other bleed valve and again cause uncontrolled bleeding and/or damage. Remedial measures, later, should include polishing the end surface of the bleed valve to remove the scarring caused by the debris.
For more information on attenuators, contact your Valmet representative.