Field Report - Slitter blade and band sharpening
Feb 18, 2020


Slitters must be sharp and properly sharpened. The cutting edge must be free of burrs and cutting remnants. The best way to maintain a continual supply of sharp slitter blades is, of course, to use the Valmet BladePool service which uses the superfinishing process for sharpening blades and bands. If, however, you choose to do your own sharpening, here are some general instructions for sharpening at the mill.
Sharpening the top slitter blade
These instructions are for Valmet slitter blades.


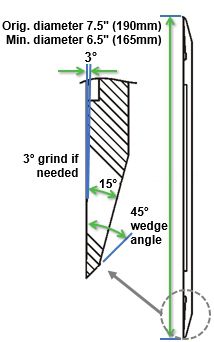
Figure 1 Top Slitter

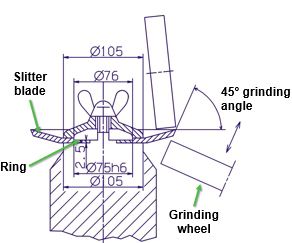
Figure 2 Grinding jig for the top slitter
Fasten the top slitter to the grinding jig.
Place the grinding device table in the direction of the top slitter's side surface.
Grind with a boron nitride wheel, Norton CB181-TBB or equivalent.
- Sharpen only the top slitter end surface at an angle of 45 degrees.
- Feed 0.02 mm (0.0008")/stroke.
- Grind the top slitter with a rotational speed of 30-60 rpm against the rotating direction of the wheel.
- When the top slitter rotates in the grinding device, feed the grinding wheel against the top slitter, and at the same time move the wheel back and forth in the cross direction.
- Grind using a small feed, and always use a coolant.
- Finally, grind the top slitter inner surface with a grinding angle of 3 degrees.
The smallest diameter of the top slitter is 165 mm (6.5").
Sharpening the bottom slitter band
These instructions are for Valmet hard metal ring model slitter bands.


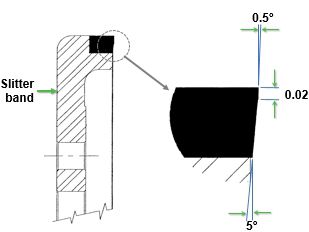
Figure 3 Band

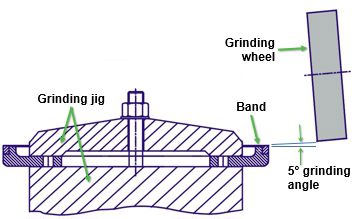
Figure 4 Grinding jig for the band
Fasten the band to the grinding jig.
Sharpen only at the band side surfaces.
Grind with a diamond wheel, Norton ASD 76-R100-B99 or equivalent.
- Feed 0.02 mm (0.0008")/stroke.
- Use the wheel peripheral speed of 23-25 m/s (75.5-82 ft/s).
- Grind the band with a rotational speed of 30-60 rpm against the rotating direction of the wheel.
- When the band rotates in the grinding device feed the grinding wheel against the band side surface, and at the same time move the wheel back and forth in the cross direction.
- Grind carefully using a small feed, and always use a coolant.


If needed, grind the band steel part with aluminum oxide wheel.
For assistance with improving the safety and efficiency of your slitting operation, review the slitter management Related Links and contact your Valmet representative.