Overview and troubleshooting of size press threading system
Dec 12, 2017
This article will describe a multiple-device threading system, briefly touching on each device, and then describe how to troubleshoot the threading system.
Example size press threading system
Consider the following example - a ropeless threading system through a size press was provided by Valmet as an upgrade. In this example, a blow plate, pickup tray and blade, (4) Valmet Tail Threading Belt [previously called FoilForce] conveyors, (4) threading pans and a nip roller are used to thread the tail from the last dryer of a dryer section through the size press to the first dryer of the next dryer section.
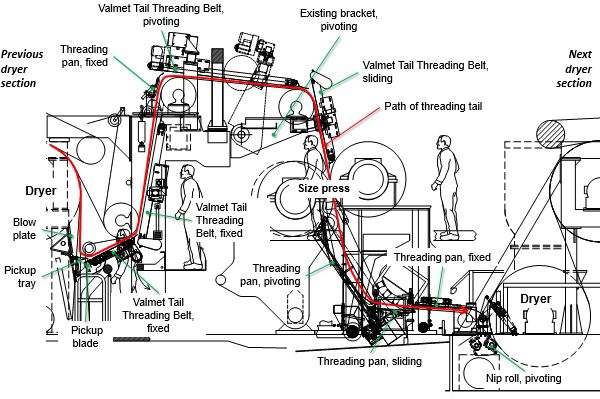
Threading through the size press (TS view)
Overview of threading system operation
The blow plate blows the tail toward the pickup tray. The pickup tray pivots to guide the tail to the blade which pivots to sever the tail. The tail then proceeds to the 1st Valmet Tail Threading Belt conveyor which guides it up under a carrying roll to the 2nd Valmet Tail Threading Belt conveyor which guides the tail to a curved fixed threading pan. The pan guides the tail up above another carrying roll to the 3rd pivoting Valmet Tail Threading Belt conveyor which guides the tail downstream above another carrying roll. The 4th Valmet Tail Threading Belt conveyor (sliding) guides the tail into the size press nip. After the size press, a pivoting threading pan catches the tail and guides it downstream through a sliding threading pan and fixed threading pan. A nip roller then nips the tail to the first dryer in the next dryer section.
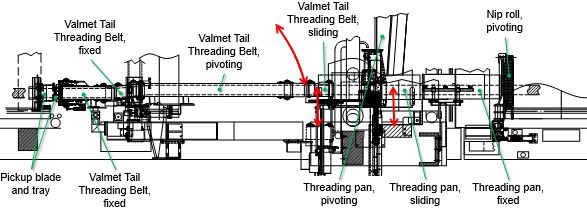
Threading through the size press (overhead view)
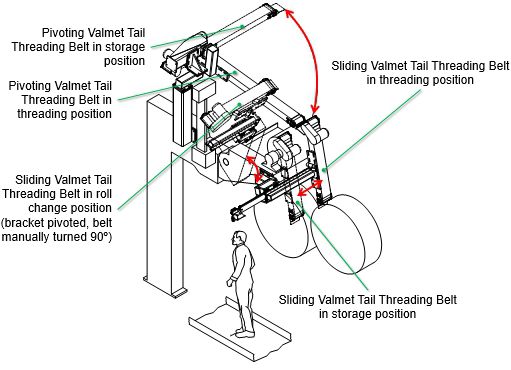
The first and second Valmet Tail Threading Belt units are fixed in position. The third Valmet Tail Threading Belt unit is normally pivoted to align with the cross direction of the machine, and is pivoted into the machine direction for threading. The fourth Valmet Tail Threading Belt unit is normally slid outside of the machine, and is slid into the machine for threading.
The first and fourth threading pans are fixed in position. The second threading pan is normally pivoted downward and is pivoted into the machine direction and threading path for threading. The third threading pan is normally slid outside of the machine, and is slid into the machine for threading.
Pick-up tray and blade
The pick-up tray pivots upward to push the tail downstream toward the blade which pivots upward to cut the tail. The tail then proceeds to the next threading device (1st Valmet Tail Threading Belt conveyor).
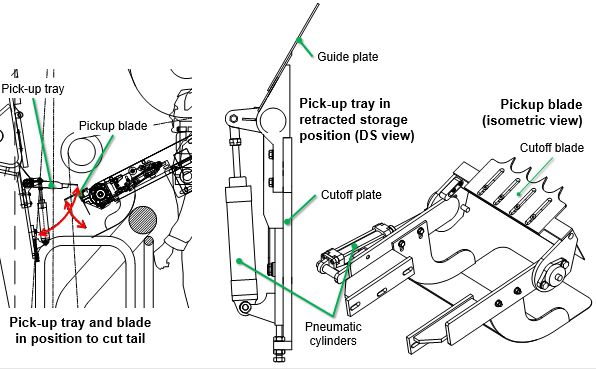
Views of the pickup tray/plate and blade
The two pickup tray and blade positions are:
- storage (retracted/pivoted in the machine direction away from the sheet)
- threading (extended/pivoted in the machine direction, close to the sheet)
After the tail is successfully threaded, the pick-up tray and blade are returned to their storage positions.
NOTE: If the tail fails to thread, or breaks during threading, but has not yet widened beyond the maximum tail width, a fresh end can be cut using the pick-up plate and blade.
Valmet Tail Threading Belt conveyors
The purpose of the Valmet Tail Threading Belt system is to speed-up the tail threading and thus improve the efficiency of the production line. The automated system not only boosts the tail threading, but also improves occupational safety. The Valmet Tail Threading Belt is a compressed air actuated and logic controlled tail threading system.
The Valmet Tail Threading Belt vacuum conveyor is based on turbo foil technology, where the basic vacuum is created using a foil, and the vacuum level can be adjusted through compressed air. The air connections required by the compressed air system are located at desired points outside the main machine frames.
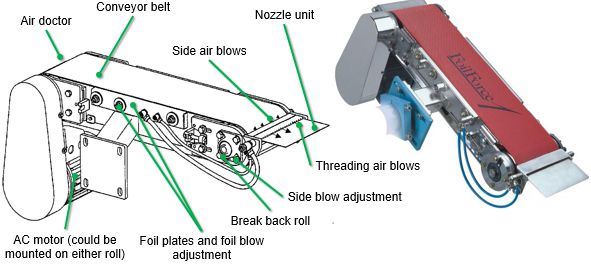
Typical Valmet Tail Threading Belt conveyor
The logic controlled tail threading system is started by the control station, which turns the tail threading belts/plates to the operating position and the belts automatically accelerate to the desired tail threading speed.
The speed is controlled by use of a frequency inverter (AC drive). The speed information of the machine is passed to the frequency inverter, which sets the desired speed difference between the belt and machine speed. Changes in the machine speed automatically change the speed of the belts.
Two Valmet Tail Threading Belt conveyors must move into position for threading
The above figure shows the pivoting and sliding movements of the 3rd and 4th Valmet Tail Threading Belt conveyors in the size press area between their respective storage and threading positions.
Note that the 4th Valmet Tail Threading Belt conveyor is mounted on an existing pivoting beam/bracket that also supports the tend side of a carrying roll above the size press. In order to access the size press from above, the 4th Valmet Tail Threading Belt conveyor is moved to the storage position, then manually turned to the cross machine to a roll change position.
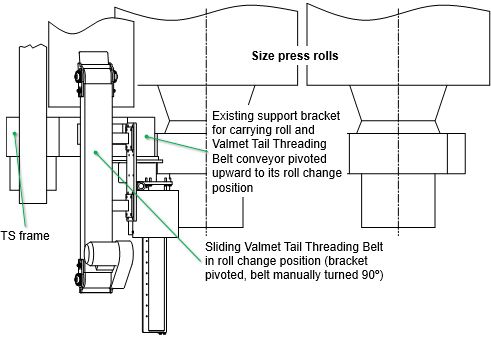
4th Valmet Tail Threading Belt conveyor in roll change position (overhead view)
Threading plates/pans
Threading plates/pans are simple plates which support and guide the tail across open spaces. Air nozzles direct air along the plate, carrying the tail by means of friction force.

All but two of the threading pans in the size press area are fixed in position. The next figure shows the movement principle of the two non-fixed threading pans.
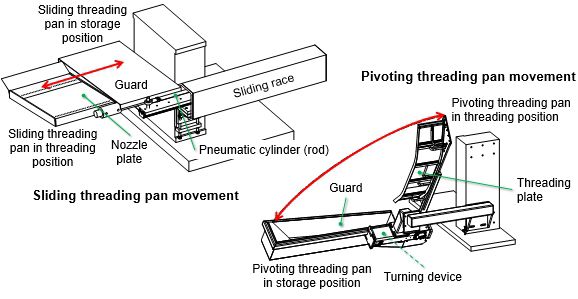
Movement of the non-fixed threading pans
Nip roller
The nip roller contacts the first dryer in the following dryer section to create a driven in-going nip to secure the tail when threading through the size press into that dryer section.
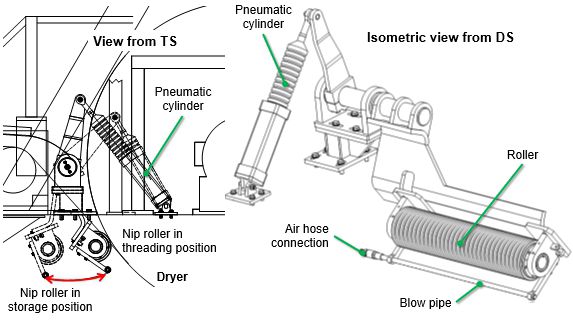
Nip roller in storage and threading positions against dryer
The nip roller pivots between a storage and threading location via a pneumatic cylinder. When tail threading devices are enabled, the nip roller pivots to touch the dryer and is driven by the dryer. The tail is carried into the nip between the roller and the dryer by a threading pan. After successful threading, the nip roller is moved back to the storage position. A blow pipe pivots with the nip roller and ensures the tail follows the dryer smoothly after it leaves the nip roller and dryer nip.
Troubleshooting the threading system
Troubleshooting threading system operation when several different threading devices are being used simultaneously is nontrivial. The following are general and device-specific tips for threading.
General tips
- Factors such as paper strength, basis weight, moisture, web profile, length of threading distance, and machine speed all affect how the equipment operates.
- Suitable pressures for knock-down-blows, break-blows and vacuum force are set using ball valves. It is recommended that the ball valve handles be removed after the final adjustment.
- Pick-up plate and Valmet Tail Threading Belt positioning pressures are set with pressure-regulating valves. Speeds of the moving components can be adjusted with restrictor valves. Refer to fluid drawings and circuit descriptions for details.
- Knock-off air blow pressures may vary from 2 to 6 bar.
- Cut-off air blow pressures should be high enough to cut the tail neatly.
- Threading plate nozzles located close to the nip should have relatively low pressures. A high volume of air in the nip tends to
- stop the tail from entering the nip. In many cases, the valve should be closed completely.
- The speeds of Valmet Tail Threading Belt units are adjusted by frequency inverters according to the machine speed. A speed difference of less than 10% is sufficient.
- The tail should be centered on the guide plates and conveyor belt. The optimum tail width has to be tested for each machine. The normal width is approximately 150 mm. The width may vary between 50 and 200 mm.
- Do not widen the web until the tail is sufficiently tensioned. If a slack web is spread, it will often break when hitting the guide plate edges or similar obstacles.
The tail will not leave the pick-up plate or its progress stops
Is the plate clear of paper scraps?
- After unsuccessful threading it is important to blow the plate clear before the next attempt.
Is the tail width appropriate?
- Normally the tail width is approx. 150 mm, but it may vary from 50 to 200 mm. Experiments will determine the optimum tail width for each machine.
Is the paper moisture appropriate?
- If paper is too wet, it will neither break nor proceed properly on the threading plate.
- If paper is too dry, it is weak and will be chaffed easily.
Is air coming out of the nozzles?
- Valve closed? Open the valve up to the mark.
- Hose ruptured? Replace hose.
- Hose kinked, obstructing air flow? Change hose position.
- Nozzle orifices clogged? Clean the orifices.
Is the solenoid valve coil energized?
- Coil failed? Replace the coil.
- No current to the coil? Find out the cause.
Solenoid valve coil is energized but still valve does not open.
- Impurities may disturb the operation of the solenoid valves. Replace the solenoid valve.
Tail is cut badly
Is the tail free to fall into the broke pit or to the floor?
- Reduce width of tail until tail is detached. Make sure the blow-off nozzles are positioned properly. Make sure the pick-up plate is close to the roll.
- (MC pick-up plates) Adjust the position of the air blow and/or increase the pressure to make sure that the tail does not contact the stationary blade as it falls.
Is the tail piling up on top of the pick-up plate?
- Increase pressure of cut-off air blow. Heavy paper grades need more pressure to the cut-off air blow than lighter ones. Normally pressure varies between 3 and 6 bar.
- Increase pressure a little at a time until tail cuts off cleanly.
- Excessive amount of air disturbs tail travel on pick-up plate and Valmet Tail Threading Belt.
Is the tail properly positioned?
- In pivoting pick-up plates models, if the entire tail is not carried to the stationary plate, double tails may occur, causing unreliable threading.
Are blow-off nozzles positioned correctly?
- Adjust nozzles correctly.
Is the pick-up plate moving too slowly?
- If the pick-up plate is moving too slowly to the tail threading position, the cut-off and blow-off air blows may start before the pick-up plate is down. Adjust the air cylinder restrictors to speed up the movement of the pick-up plate.
Is the paper on top of the cut-off blade (MC models)?
- Clean the blade.
Is the timing of the air blows correct?
- Adjust the control logic as needed.
Tail is not traveling on the Valmet Tail Threading Belt unit
Is the Valmet Tail Threading Belt fabric rotating?
- Fabric is slack: Stretch the turning roll or change fabric.
- Is drive motor running?: Find out fault.
- Is the timing belt worn or broken? Replace the belt.
Is web escaping from Valmet Tail Threading Belt unit?
- Fabric speed is incorrect: Fabric is slack; stretch or replace fabric.
- Fabric is clogged, preventing air flow through: Clean or replace fabric.
- No vacuum or incorrect vacuum created in Valmet Tail Threading Belt unit: Check operation of valves, condition of pneumatic hoses, nozzles, foils and foil plugs. Clean any impurities.
- Make sure that spacing between nozzle unit and roll is 2 to 3 mm.
- Check nozzle unit for sufficient back blow.
- Check web tension; adjust as needed.
Tail does not travel on the threading plate
Is the tail traveling too slowly?
- Increase the pressure gradually until the tail is seen running rapidly along the plate.
Is the tail torn or travelling restlessly?
- Too much air: reduce gradually
- Tail may be too dry.
Tail is not drawn into the nip
Does the tail go past the nip?
- Too much air in the last nozzles of the threading plate. Reduce the pressure.
- Adjust the angle of the guide plate.
Tail goes into the nip but remains slack
Is the tail bagging at any point?
- Adjust speed differences.
- If there is a nip roll, it must be on speed control during tail threading.
Tail is not tensioned properly on downstream winding equipment
- Paper present on the reel spool
- Incorrect loading/relief pressures during primary reeling. May have a gap between the spool and drum.
- Bent or out-of-balance reel spools.
- Worn reel spool surface.
- Turn-up position is too high, resulting in poor contact between the reel spool and drum.
Tail goes into the nip but is stretched and broken
Is the tail broken in the nip?
- Adjust speed differences.
Is the tail coming out of the machine?
- Adjust the roll or reel drive.
- Start spreading the web earlier.
For more information on troubleshooting and/or enhancing your tail threading system, contact your Valmet representative.